
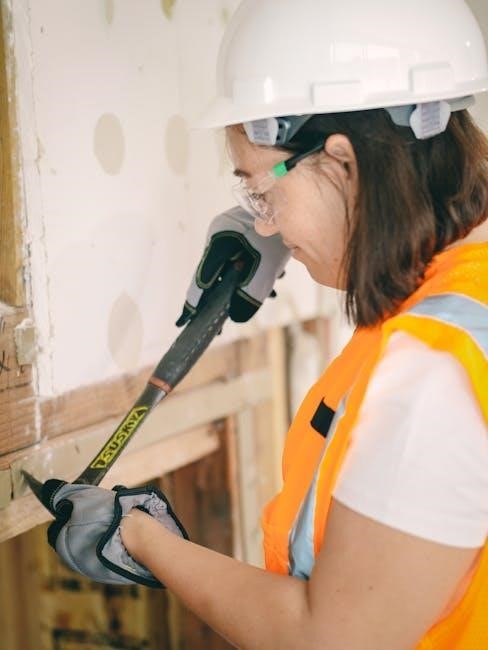
Maintaining your Ground Assault front bike suspension is crucial for optimal performance and safety‚ especially on rough terrain. Regular checks‚
like those for play exceeding 1mm‚ ensure a smooth ride and prevent damage.
Understanding the Importance of Regular Maintenance
Consistent maintenance of your Ground Assault bike’s front suspension dramatically extends its lifespan and preserves peak performance. Neglecting this can lead to costly repairs or‚ worse‚ compromise safety during challenging rides. Regular checks‚ such as verifying for excessive play – more than 1mm at the fork brace – are vital.
Proper suspension function absorbs impacts‚ enhancing control and rider comfort‚ particularly on rough or steep terrain. Ignoring maintenance can cause sticking‚ binding‚ or oil leaks‚ diminishing responsiveness. Following the manufacturer’s guidelines‚ found at resources like www.srsuntour-cycling.com‚ ensures optimal operation and prevents premature wear of critical components like bushings and seals.
Tools and Materials Needed
For effective Ground Assault front suspension maintenance‚ gather essential tools. You’ll require specific fork oil – viscosity determined by your fork model and rider weight – and a method for accurate measurement during filling. Standard tools include Allen wrenches‚ a torque wrench (for precise tightening)‚ and potentially specialized tools for removing seals and bushings.
Cleaning supplies like degreaser and rags are crucial. A seal removal tool‚ though not always necessary‚ simplifies the process. Access to the official service manual for your specific fork (available via SRSuntour’s service request at www.srsuntour-cycling.com) is highly recommended. Protective gloves and eye-wear are also advised for safety.

Fork Disassembly
Disassembly requires careful steps: removing the fork from the bike‚ then separating the upper and lower assemblies for inspection and component access.
Removing the Fork from the Bike
Begin by loosening the stem bolts securing the handlebar stem to the fork steerer tube. Carefully disconnect any cables or sensors attached to the fork. Loosen the front wheel axle and remove the wheel. Next‚ detach the brake caliper from the fork‚ ensuring not to damage the brake line.
Support the fork as you loosen the headset bearings and gently slide the steerer tube downwards‚ removing the fork from the head tube. Take care not to lose any headset components during this process. A clean workspace is essential to keep track of all parts during disassembly. Remember to consult your specific fork manual for detailed instructions‚ as procedures can vary between models like the XCM-JR.
Disassembling the Upper Assembly
With the fork removed‚ begin by removing the dust seal and foam ring from the upper stanchion. Carefully unscrew the top cap‚ noting the compression adjustment mechanism beneath. Release any air pressure if applicable‚ following the manufacturer’s guidelines.
Next‚ remove the handlebar stem and any internal spacers. Disconnect the rebound damping adjuster if present. Gently pull out the damper rod or cartridge assembly‚ taking care not to damage the internal components. Document the order of parts as you disassemble for easier reassembly. Refer to the SRSuntour service resources for model-specific diagrams and instructions;
Disassembling the Lower Assembly
Begin by removing the brake mounting bolts and caliper. Carefully slide the lower legs off the stanchions‚ being mindful of any residual fork oil. Unscrew the bottom cap to release the spring or air chamber pressure.
Next‚ remove the slider sleeves‚ inspecting them for excessive play – more than 1mm at the fork brace indicates wear and potential replacement. Disassemble the damper assembly‚ noting the position of shims and valves. Pay close attention to the order of components for reassembly‚ consulting SRSuntour’s resources if needed. Drain the remaining fork oil into a suitable container.
Damper Rod/Cartridge Inspection
Thoroughly inspect damper rods for wear or damage. Check cartridge seals for leaks or deterioration‚ replacing them if necessary to maintain optimal damping performance.
Inspecting Damper Rods for Wear
Careful examination of the damper rods is essential during suspension maintenance. Look closely for any signs of pitting‚ scoring‚ or corrosion on the rod’s surface. These imperfections can compromise the seal’s ability to maintain a proper oil barrier‚ leading to reduced damping performance and potential leaks.
Pay particular attention to the areas where the seals ride. Even minor damage can cause friction and hinder smooth movement. If significant wear is detected‚ replacement of the damper rods is highly recommended to restore the suspension’s functionality and prevent further damage to other components. Remember to consult the SRSuntour service resources for specific guidance.
Cartridge Seal Inspection and Replacement
Cartridge seals are vital for maintaining hydraulic pressure and preventing contamination within the fork. Inspect these seals for cuts‚ cracks‚ or deformation. Any damage compromises the seal’s integrity‚ leading to oil leakage and diminished damping performance.
Replacement requires specialized tools and careful technique to avoid damaging the cartridge itself. Ensure the new seals are properly lubricated with fork oil before installation. Refer to the SRSuntour service request resources (http://www.srsuntour-cycling.com/service/service-request) for detailed instructions specific to your fork model‚ like the XCM-JR‚ and torque specifications.
Stanchion and Slider Tube Maintenance
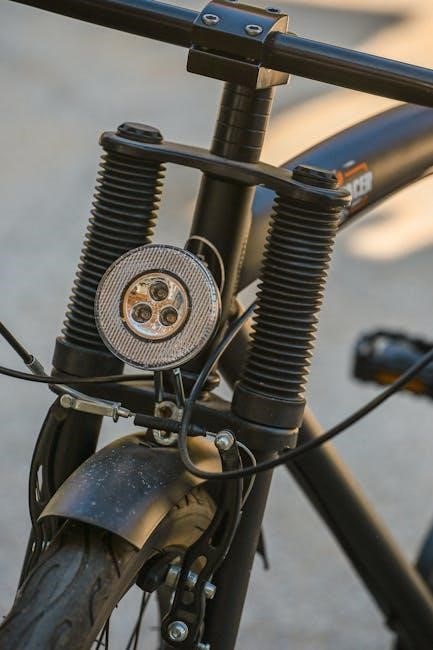
Regularly inspect stanchions for bends or scratches; cleaning and lubrication are key. Check for excessive play—over 1mm at the brace indicates slider sleeve wear.
Checking for Bends and Scratches
Thoroughly inspect the stanchion tubes for any visible bends or distortions. Even slight bends can compromise suspension performance and potentially lead to seal failure. Rotate the stanchion while visually scanning its entire length‚ paying close attention to areas that may have experienced impacts.
Next‚ carefully examine the stanchion surface for scratches‚ gouges‚ or pitting. Scratches can create pathways for dirt and debris to enter the fork‚ accelerating wear on the seals and bushings. Minor scratches can sometimes be polished out‚ but deeper damage may require stanchion replacement. Remember‚ maintaining a smooth stanchion surface is vital for optimal suspension function and longevity.
Cleaning and Lubricating Stanchions
After inspecting for damage‚ thoroughly clean the stanchions with a soft‚ lint-free cloth and isopropyl alcohol to remove any dirt‚ grime‚ or old lubricant. This prepares the surface for fresh lubrication‚ ensuring smooth movement and preventing premature wear.
Apply a fork-specific lubricant sparingly to the stanchions. Avoid using harsh chemicals or abrasive cleaners‚ as these can damage the seals. Wipe off any excess lubricant with a clean cloth. Proper lubrication minimizes friction‚ enhances suspension responsiveness‚ and protects against corrosion‚ contributing to a longer fork lifespan and improved riding experience.
Slider Sleeve Inspection and Replacement
The slider sleeves guide the stanchions and prevent dirt ingress. Inspect them carefully for any signs of damage‚ such as cracks‚ scratches‚ or excessive wear. To check for play‚ apply the front wheel brake and gently rock the bike back and forth at the handlebar stem.
Excessive play – more than 1mm at the fork brace – indicates worn slider sleeves requiring replacement. Removing and installing new sleeves requires specialized tools and careful attention to avoid damaging the fork lowers. Refer to the Ground Assault manual for specific instructions and torque specifications to ensure proper installation and functionality.
Bushings and Seals
Worn bushings and seals significantly impact suspension performance‚ causing play and potential oil leaks; identifying and replacing them restores smooth‚ controlled operation.
Identifying Worn Bushings
Detecting worn bushings requires a careful inspection of the fork’s lower legs. Excessive play‚ noticeable when applying the front wheel brake and gently rocking the bike back and forth at the handlebar stem‚ is a primary indicator. Specifically‚ any movement exceeding 1mm at the fork brace suggests bushing wear.
Visually‚ examine the bushings for cracks‚ deformation‚ or signs of corrosion. A gritty or rough feel when rotating the stanchions within the lower legs also points to bushing degradation. Remember that worn bushings contribute to stiction and reduced damping effectiveness‚ ultimately impacting ride quality and control. Regular checks are vital for maintaining optimal suspension performance.
Bushing Removal and Installation
Bushing removal typically requires a specialized bushing removal tool to avoid damaging the slider sleeves. Carefully press the old bushings out‚ ensuring even pressure to prevent binding. Before installing new bushings‚ thoroughly clean the slider sleeves‚ removing any debris or corrosion.
Lubricate the new bushings with fork oil before pressing them into place using a bushing installation tool. Ensure the bushings are seated squarely and fully within the sleeves. Verify proper alignment and smooth movement after installation. Incorrect installation can lead to stiction or premature bushing failure‚ so precision is key for optimal suspension function.
Seal Removal and Installation
Seal removal often requires a pick or small‚ blunt tool to carefully pry the old seals from the fork lowers. Avoid using sharp objects that could scratch the stanchion tubes. Thoroughly clean the seal grooves before installing new seals‚ removing any dirt or old oil residue.
Lubricate the new seals with fork oil before gently pressing them into place‚ ensuring they are seated correctly and evenly within the grooves. A seal installation tool can help prevent damage. Inspect the seals for proper seating and a tight fit to prevent oil leaks and maintain suspension performance. Proper seal installation is vital.

Fork Oil Management
Selecting the correct fork oil weight‚ as specified in your manual‚ is essential. Drain old oil completely and refill with the recommended amount for your weight.
Choosing the Correct Fork Oil Weight
Determining the appropriate fork oil weight is paramount for achieving optimal suspension performance. Your Ground Assault bike’s manual will explicitly state the recommended viscosity for your specific fork model and rider weight. Using the incorrect weight can drastically affect damping characteristics‚ leading to a harsh ride or a lack of control.
Lighter oils generally provide a plusher feel‚ ideal for lighter riders or smoother trails‚ while heavier oils offer more resistance and are better suited for aggressive riding and heavier individuals. Always prioritize the manufacturer’s recommendation; experimentation without proper knowledge can compromise suspension function and potentially cause damage.
Draining Old Fork Oil
Before refilling with fresh oil‚ completely draining the old fluid is essential. Begin by removing the fork from the bike‚ following the disassembly instructions. With the fork cap loosened (but not fully removed to avoid a messy spray!)‚ compress the fork fully and then quickly release it. This action will force the old oil out of the damper rod or cartridge.
Repeat this compression and release cycle several times until the oil flow ceases. Carefully collect the drained oil in a suitable container for responsible disposal. Ensure all traces of old oil are removed before proceeding to the next step – filling the fork with new‚ correctly weighted oil.
Filling the Fork with New Oil
After thoroughly draining the old fluid‚ it’s time to introduce fresh fork oil. Consult your Ground Assault fork’s manual to determine the correct oil weight and volume for your rider weight and riding style. Slowly pour the new oil into the fork stanchion‚ using a measuring device to ensure accurate filling.
Compress the fork several times to help the oil settle and bleed any trapped air. Add more oil as needed to reach the specified level. Avoid overfilling‚ as this can negatively impact performance. Proper oil level is critical for optimal damping and a comfortable ride.
Air Spring Maintenance (If Applicable)
Regularly check air pressure to maintain optimal performance. Inspect air spring seals for damage and replace if necessary‚ ensuring a clean air chamber for smooth operation.
Checking Air Pressure
Maintaining the correct air pressure within your Ground Assault fork’s air spring is paramount for achieving optimal suspension performance tailored to your weight and riding style. Use a reliable shock pump to accurately measure the air pressure‚ referencing the manufacturer’s specifications – often found on the fork itself or in the user manual.
Regularly check the pressure before each ride‚ as it naturally decreases over time. Adjust the pressure in small increments‚ noting how each change affects the fork’s feel on the trail. Proper air pressure ensures the fork responds effectively to bumps and provides a controlled‚ comfortable ride. Incorrect pressure can lead to harshness‚ bottoming out‚ or reduced small-bump sensitivity.
Air Spring Seal Replacement
If you notice a loss of air pressure despite proper inflation‚ or observe any dirt accumulation around the air valve‚ the air spring seal may require replacement. This is a critical component preventing air leakage and maintaining fork performance. Carefully deflate the fork completely before attempting any seal work.
Using appropriate tools‚ gently pry out the old seal‚ taking care not to damage the air spring internals. Clean the seal housing thoroughly before installing the new seal‚ ensuring a proper fit. Lubricate the new seal with fork oil before installation. A correctly installed seal will restore air retention and ensure consistent suspension performance‚ preventing unwanted pressure loss during rides;
Air Chamber Cleaning
Contaminants within the air chamber can compromise seal performance and reduce suspension responsiveness. After removing the air spring and seals‚ a thorough cleaning is recommended. Use a solvent specifically designed for suspension components‚ avoiding harsh chemicals that could damage internal parts.
Carefully wipe down the inner walls of the air chamber‚ removing any dirt‚ debris‚ or old lubricant. Inspect for any signs of corrosion or damage. Ensure the chamber is completely dry before reassembly. A clean air chamber promotes smooth air spring movement‚ extending seal life and maintaining optimal suspension function‚ contributing to a more controlled and comfortable ride.
Reassembly and Final Checks
After meticulous reassembly‚ verify proper torque specifications for all components. Perform a bounce test and adjust settings for optimal performance and rider weight.
Reassembling the Fork
Carefully reverse the disassembly process‚ ensuring all components are properly aligned and seated. Begin with the lower assembly‚ lubricating bushings and seals with appropriate fork oil during installation. Pay close attention to the damper rod or cartridge assembly‚ confirming correct orientation and secure fastening.
Next‚ reassemble the upper assembly‚ meticulously tightening all bolts to the manufacturer’s specified torque values. Double-check the stanchion tubes for any signs of damage or binding. Finally‚ reinstall the fork into the bike’s steerer tube‚ again adhering to torque specifications for the stem and headset. A systematic approach prevents overlooking crucial steps.
Torque Specifications
Adhering to precise torque specifications is paramount during reassembly to prevent damage and ensure optimal performance. Consult your Ground Assault fork’s manual – specific values vary by model (e.g.‚ XCM-JR) and component. Typically‚ stem bolts require around 5-7 Nm‚ while fork crown race bolts need 8-10 Nm.
Lower leg bolts often fall within the 12-15 Nm range. Over-tightening can strip threads or crush components‚ while under-tightening risks loosening during riding. Utilize a calibrated torque wrench for accurate measurements. Always double-check critical fasteners after the initial ride to confirm they remain secure.
Bounce Test and Initial Adjustment
Following reassembly‚ perform a bounce test to verify proper fork function. Gently apply your weight and repeatedly compress the fork; it should move smoothly without binding or excessive stiction. Listen for any unusual noises indicating potential issues.
Initial adjustments involve setting sag – the amount the fork compresses under your weight. Refer to the Ground Assault manual for recommended sag percentages. Adjust air pressure (if applicable) or spring preload to achieve the correct sag. Fine-tune rebound damping to control the fork’s return speed‚ ensuring it doesn’t feel too fast or slow.
Troubleshooting Common Issues
Common problems include sticking‚ binding‚ or oil leaks. Excessive play—more than 1mm at the brace—indicates worn bushings or slider sleeves needing replacement for safe riding.
Fork Sticking or Binding
Fork sticking or binding often indicates contamination within the suspension system. This could be dirt‚ debris‚ or degraded fork oil hindering smooth movement. Begin by thoroughly cleaning the stanchions and slider sleeves‚ ensuring no visible grime remains. Inspect the bushings and seals for damage or wear‚ as these contribute significantly to friction.
If cleaning doesn’t resolve the issue‚ draining and replacing the fork oil is essential. Use the correct oil weight specified in your Ground Assault manual – incorrect viscosity can exacerbate binding. During reassembly‚ ensure proper lubrication of all moving parts. Excessive braking with the front brake can also contribute to binding‚ so modulate brake pressure effectively.
Oil Leaks
Oil leaks from your Ground Assault fork typically point to failing seals. Carefully inspect the fork seals at the bottom of the stanchion tubes for any visible damage‚ cracks‚ or oil residue. Even small leaks should be addressed promptly to prevent further contamination and performance loss.
Seal replacement requires specific tools and careful technique; consult your fork’s service manual or a qualified mechanic. Also‚ check the slider sleeves for scratches or corrosion‚ as these can compromise seal integrity. Ensure proper torque specifications are followed during reassembly to avoid over-tightening or under-tightening‚ which can cause leaks.
Excessive Play in the Fork
Excessive play in your Ground Assault fork‚ particularly noticeable when pushing the bike back and forth with the front brake applied‚ indicates worn bushings or a loose headset. A play exceeding 1mm at the fork brace requires immediate attention. Inspect the bushings within the lower assembly for wear‚ cracks‚ or deformation.
Worn bushings allow unwanted movement‚ impacting steering precision and control. Also‚ verify the headset is properly adjusted; a loose headset can mimic fork play. Replacing bushings and correctly tightening the headset are crucial for restoring optimal handling and preventing further damage to the fork.
Resources and Further Information
For detailed manuals and service requests regarding your Ground Assault fork‚ visit SRSuntour’s website at www.srsuntour-cycling.com. Explore their support section!
SRSuntour Service Request: http://www.srsuntour-cycling.com/service/service-request
If you encounter difficulties during your Ground Assault suspension maintenance‚ or are unsure about specific procedures‚ SRSuntour offers a dedicated service request system. Accessible via the provided link‚ this platform allows you to directly contact their support team for assistance.
This is particularly useful when dealing with complex issues‚ identifying the correct parts‚ or navigating specific fork models like the XCM-JR. Remember to clearly describe your problem and include relevant details about your bike and the suspension component. Utilizing this resource ensures you receive expert guidance for a successful repair and continued riding enjoyment.
Finding Specific Fork Manuals
Locating the correct manual for your Ground Assault front fork is paramount for accurate maintenance. SRSuntour’s website‚ www.srsuntour-cycling.com‚ is the primary resource. Manuals provide detailed instructions‚ torque specifications‚ and parts diagrams specific to your fork model – crucial for tasks like oil changes and seal replacements.
Ensure you identify the exact model number (e.g.‚ XCM-JR) to download the appropriate documentation. These manuals often detail category suitability‚ informing you if your bike is designed for rough terrain and steep slopes. Proper documentation prevents damage and ensures safe operation.